This guide will show you how to create an offer and add a main product, order bump, and upsell to it.
When you create an offer, only the main product is required; the order bump and upsell are optional. The order bump is an additional product that you can offer to your customers alongside the main product in your offer. The upsell is a separate product that you can present to customers after they've made a purchase through your offer.
Jump to:
How to create your new offer and add a main product
How to add an order bump to your offer
How to add an upsell to your offer
How to create your new offer and add a main product
Create your offer
- Head to Offers and click on New Offer.
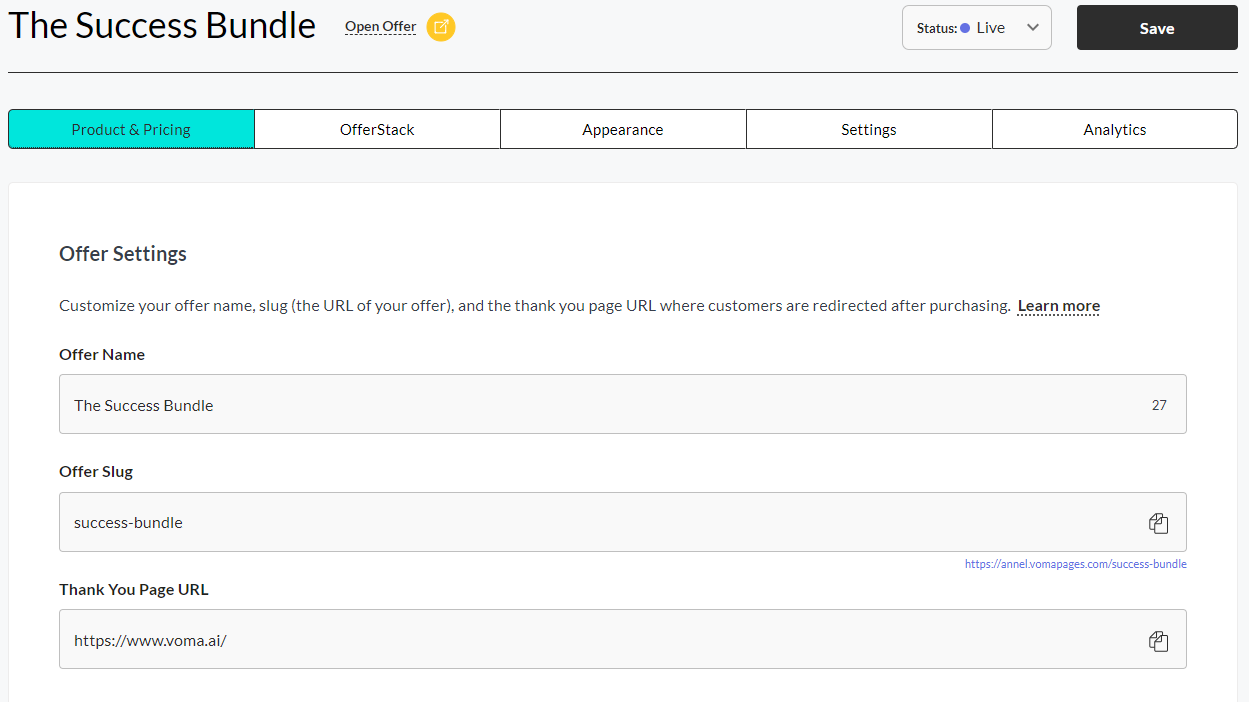
- In the first section on the Product & Pricing tab, you'll be able to customize some general Offer Settings, like the offer name, slug (the URL of your offer), and the thank you page URL where customers are directed to after purchasing.
After completing all the required fields, you can add your main product as shown below.
🔎 Sneak Peek:
Add a Main Product to your offer
📑 Note: When you create an offer, you can sell any product or bundle in your account with options for a one-time charge, multi-pay, or a subscription. Additionally, you have the flexibility to sell the same product through different offers at different prices.
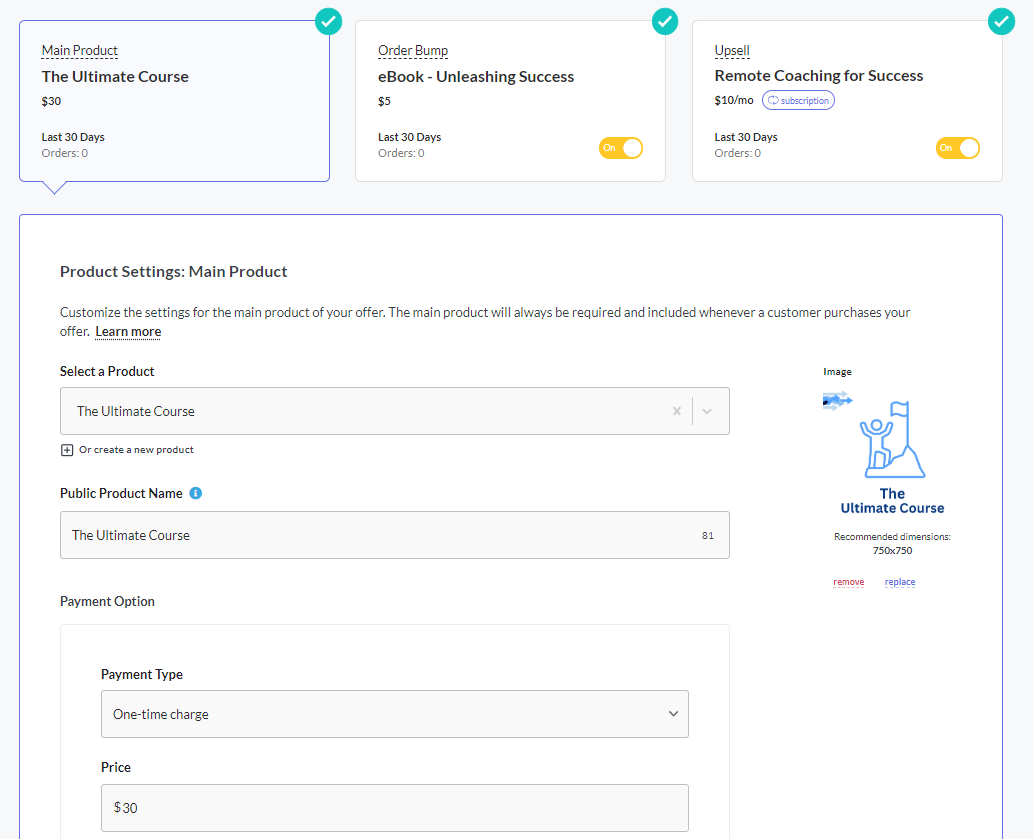
- You can add the Main Product of your offer at the bottom of the Product & Pricing tab.
- Select an existing product or bundle from the dropdown list, or create a new one. Head over to Creating a product if you need help with this.
- Customize the settings for the main product of your offer like the name, payment type, price, and image (the recommended dimensions are 750x750). When you're done, click Save.
📑 Note: The main product will always be required and included whenever a customer purchases your offer.
How to add an order bump to your offer
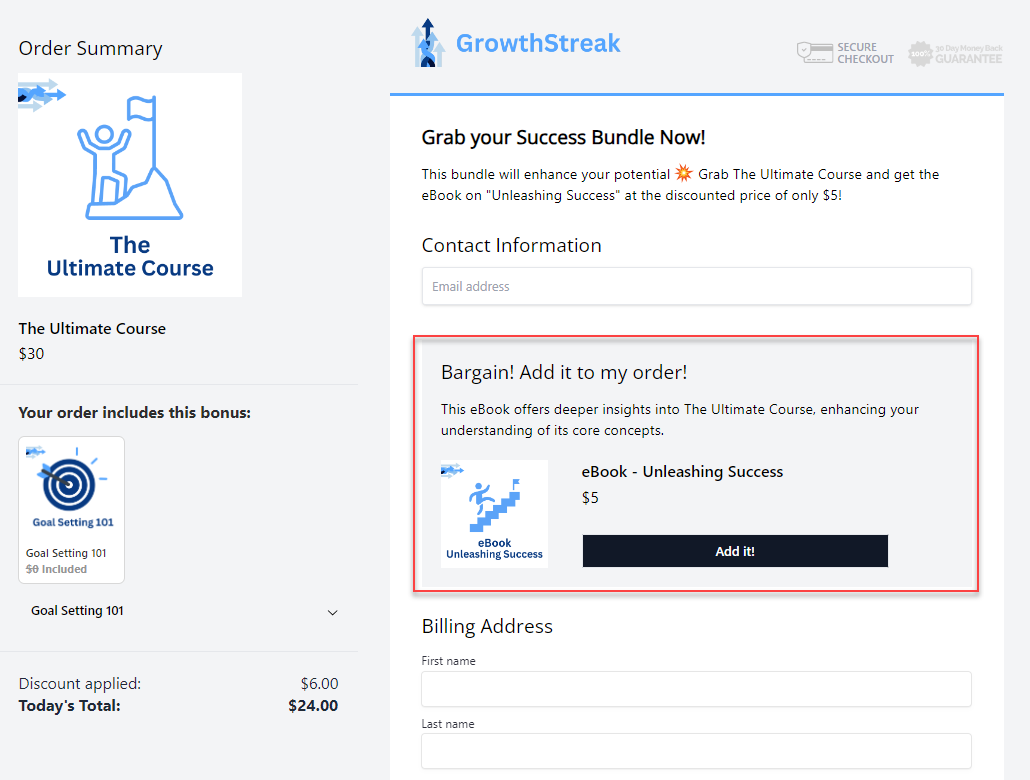
📑 Note: Should you choose to also include an order bump and upsell, it's important to understand that with an order bump, the customer decides to include something in their order before making the initial purchase. An upsell occurs after the initial purchase.
An order bump is a secondary, complementary offer that can be displayed on your main offer in addition to the main product that is being sold.
- In the Product & Pricing tab, click on the Order Bump section.
- Customize the Product Settings of the order bump, and click Save.
- Headline: The header message for the order bump section.
- Description: Additional sentences you can add to describe the order bump.
- Product: In the drop-down, select the order bump product, or create a new product. (This can also be a bundled product.)
- Product Name: If you want your customers to see a different name than what is in your Stripe account you can use this optional field.
- Payment Type: Select a one-time charge (order bumps do not currently support other payment types).
- Price: The price for the order bump. This can be different than the default price of your product.
- Order Bump Image: Upload an image for the order bump. Recommended dimensions are 750x750.
- Now toggle the On/Off button to activate or de-activate the order bump.
How to add an upsell to your offer
An upsell is an offer that will immediately be visible to people after they purchase your offer. This means that everyone who views your upsell will have purchased the main product you are selling on the offer, and possibly also your order bump if you have an order bump enabled.

- Click on Create an Upsell in the Upsell section of your offer, or head to the Upsells tab and click on New Upsell.
- Customize the details of the upsell, and click Save.
- Upsell Name: Internal name - only you will see this name, not your customers.
- Product: Select the product that you will be offering as an upsell. (This can also be a bundled product.)
- Payment Type: Select a one-time charge or subscription.
- Price: Enter the price of the upsell product.
- As soon as you're done, and you saved your upsell details, the customization section will be visible where you can further enhance your upsell by customizing the headline, description, button text, optional product image or video, purchase confirmation, and colors. When you're done, click Save.
- To attach your upsell to a specific offer, select the offer, click on the Upsell section of the offer, and select the upsell from the dropdown list. Click Save.
- Now toggle the On/Off button to activate or de-activate the upsell.
🔎 Sneak Peek:
🔗 Now it's time to head over to Customizing the appearance of your offer
❔ If you have any questions, please let us know at help@voma.ai or in our live chat at the bottom right of your screen